Showing posts with label Topiary. Show all posts

Halloween Pumpkin Topiary With Spiders 2012 Ideas from HGTV

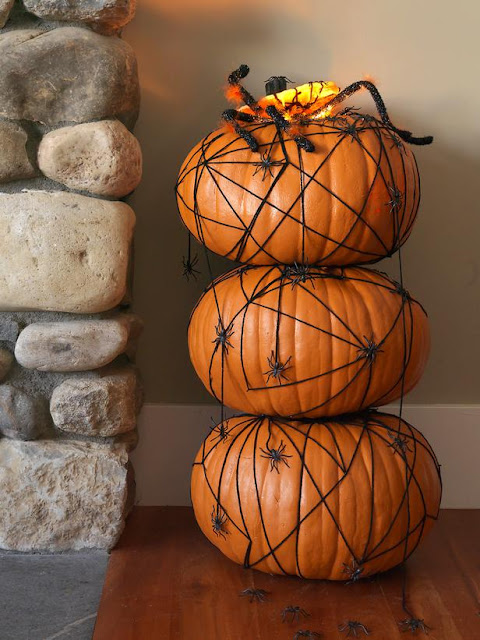
We stacked three plain pumpkins together then adorned them in spiders to make a spooky Halloween decoration.


To make this adorable pumpkin topiary, we pinned on spiders and wrapped the pumpkins with black yarn.

Tools and Supplies

serrated knife
scissors
hot-glue gun
3 carving pumpkins (we used faux pumpkins from Funkin)
30 to 40 straight pins with a black tops
flashlight
black yarn
small plastic toy spiders
one large spider


Carve and Stack

Carve the top and bottom of the top pumpkin in the stack. Carve the bottom of the middle pumpkin in the stack. This way stack on top of each other and the top one will have an opening for the flashlight.


Insert Pins

Push the black sewing pins into the pumpkins in a random pattern. Leave half of the pin sticking out. Use about 15 pins per pumpkin.


Create the Spider's Web

Starting at the bottom, wrap the yarn around one of the pins then bring it to the next pin, wrap it around and repeat. Keep weaving the yarn back and forth around the pins until you have one big web. If necessary, use the glue gun on the yarn to keep it from moving.


Add Spiders

Tie or glue small strands of yarn to several of the spiders. Tie the strands to the webbing so the spiders will hang down. Then glue some spiders directly to the webbing. Add several to the top to make it look like they are escaping. Place a few on the floor and make them look like they are about to scatter.


Include Mama Spider

Insert a flashlight into the top pumpkin to illuminate the large spider. Then place the spider as if she's escaping, too (again, be careful of the pins).


How to Make an Illuminated Pumpkin Topiary : Halloween 2012 Ideas

We turned three plain pumpkins into a glowing centerpiece to light up a front porch, Halloween party or Thanksgiving table.


To make this festive centerpiece, we drilled holes in the pumpkins, painted them silver then added some holiday lights and a few crystals.

Tools and Materials

serrated knife
drill with large bit (optional)
scissors
extension cord
3 carving pumpkins (we used faux pumpkins by Funkin)
holiday lights with 25 to 50 clear bulbs
brilliant metal spray paint
3 strands of wire with crystal beads
dry-erase marker
painter's tarp


Carve and Cut

Carve a hole in the bottom and the top of the three pumpkins and remove the innards. On the bottom pumpkin, make the hole a little to the side so the light strand's plug can get through. Do not cut hole near the stem in the top pumpkin. The hole has to be big enough to be able to put your hand in and pull the light strands through the holes.

Mark for Light Holes

Use a dry-erase marker to make small circles where you want the bulbs to come out of the pumpkins.


Cut Light Holes

Use a serrated knife or a drill to cut out the circles. Double check the size by inserting one of the bulb sockets (take the bulb out to test it). Make the hole bigger until the socket can fit through, but not too big — you don't want the bulb to slide out.


Paint

Place the pumpkins on a tarp and spray-paint them with the brilliant metal paint. Let them dry.


Prep the Lights

Check that the lights are working and then remove all the bulbs from their sockets. This will make it easier to thread the strand through the pumpkins.


Thread the Lights

Starting with the bottom pumpkin, pull the sockets through the holes and then screw on the bulb to keep it in place. Make sure you leave enough of the strand to come out of the bottom of the pumpkin and plug into an extension cord or outlet. Work your way up the pumpkin and then come out the top and move into the next pumpkin. Leave some wiggle room in between.


Add Extra Sparkle

Wrap the pumpkins with crystal strands (cut to size if necessary) around the bottom, middle and top to give the topiary a little extra glamour.


Ways to Make a Pumpkin Topiary : Halloween 2012 Ideas from HGTV

4 Ways to Make a Pumpkin Topiary

Don't just decorate with one pumpkin; stack three together to create a clever topiary.


Elegant Entry

Create a beautiful entry this fall with a nature-inspired topiary. Wrapped in baby's breath, vines, greenery and a few feathers, this trio of gourds matches the porch's natural colors and style.  

Spider's Nest

This totem is carefully wrapped in tiny spiders and black yarn. The big mama spider on top is illuminated by a flashlight inserted inside the top pumpkin. 


Zigzag

This illuminated chevron topiary will help guide trick-or-treaters to your door. The design lends a modern feel, but it is also reminiscent of Charlie Brown, the kid who got nothing but rocks in his treat bag.

Light 'Em Up

These pumpkins are illuminated with clear lights and strands of crystal. This elegant stack will last all fall. It makes a great Thanksgiving centerpiece as well as a Halloween beacon.

How to Make A Natural Pumpkin Topiary : Halloween 2012 Ideas from HGTV

To make this fall porch decoration, we stacked three pumpkins in a planter then adorned the pumpkins in vines, greenery, baby's breath and a few feathers.

Tools and Materials

serrated knife
scissors
hot-glue gun
3 pumpkins (we used faux pumpkins by Funkin)
painter's tarp
greenery (U-shaped) pins
grapevine (twigs)
1 to 2 long bows of artificial greenery (boxwood looking)
2 packages of dried flowers (baby's breath)
5 bunches of feathers
2 to 3 bunches of artificial flowers or grass-like (pom-pom) stems
1 large urn planter


Paint and Prep

In order to be able to stack the pumpkins, break off the stem of the bottom two pumpkins. or cut holes in the bottom of the top two pumpkins. Paint the pumpkins if desired.

Wrap in Vine

On a painter's tarp, layout all the pumpkins and greenery. Start with the bottom pumpkin, unwind the grapevine and cut a piece to go around the bottom of the pumpkin, let some come up from the bottom a little. Use u-shaped pins to hold it in place.


Wrap in Greenery

Cut a piece of the boxwood greenery and place it under the grapevine twigs, use pins to hold it in place.


Add Feathers

Place three of the five bunches of feathers around the grapevine. You may want to use the scissors and cut off most of the stem and then tuck in the rest in between the pumpkin and the grapevine. Use a hot-glue gun (medium heat) to keep in place.


Add Flowers

Cut pieces of the flowers and its greenery then tuck them into the grapevine around the base and glue into place.


Fill in With Baby's Breath

Use dried flowers to fill in the rest, make sure some pieces will hang over the edge of the urn.


Continue onto the Other Pumpkins

Repeat the steps on the upper two pumpkins, but don't use as much decoration as you did on the base pumpkin.


Use the Tarp to Stuff the Urn

We used our tarp not only as a work surface, but we put it in the bottom of the urn to bring the height of the pumpkins up close to the top of the urn. If a tarp doesn't work, try rocks, packing peanuts or old towels. Place the pumpkins in the urn on top of the tarp, allowing it to sink slightly into the middle of the tarp. Make sure none of the tarp shows or the inside edges of the urn.

Fill in Where Necessary

When everything is in place, fill in any blank spaces with more flowers, feathers or even birds.


Blogger Template By Suudy Gondrong